
Store #
Site Builder offers an easy solution if you want to have simple e-commerce shop. Here is how you can add a new page with all your products to your site:
- Open the site that you want to customize through Site builder.
If you already have a page and just want to add Store to it go to step 9. - Right-click on the site’s menu and choose ”Add Menu Item”.
- Write desired menu name in field ”Item Name”, choose ”Content” below it and select which page’s content to copy (you actually don’t need this content and will delete it afterward so it doesn’t matter which option you’ll choose).
- Click Apply button.
- The new page should be added to the menu. If you don’t see it try to extend the width of the menu box. There are two ways to do this:
- Go with your mouse to the bottom right corner of your menu. The mouse cursor should change to an arrow. Click and drag to extend the width or height.
- Right click on menu box and select ”Properties”. Go to ”Options” tab and write a higher number in field ”Width”. Click Apply.
- Save Draft.
- Click on the newly created page in the menu.
- Remove all unnecessary boxes using right click and ”Remove” on each of them.
- Once you have a clean page find ”Commerce” icon in the top navigation.
- Go with your mouse on top of it to see the sub-menu and Drag&Drop ”Store” to the page’s container.
- Use mouse or keyboard to position and resize it.
- Save Draft.
Shopping cart #
Now you have added E-commerce box with products to your site. Let’s continue with adding a shopping cart to your page. There are a few options you can choose. Here we’ll introduce two of them and of cource if you have any other idea feel free to experiment:
Shopping cart button in the header #
You can add the shopping cart functionality in the header of your site (next to your logo and menu) – this way it will be visible on all pages.
How to do it?
- Go with your mouse on top of ”Commerce” icon to see the sub-menu and Drag&Drop ”Store cart” to the site’s header, right next to the menu for example.
- Use mouse or keyboard to position and resize it.
- Right click on the shopping cart and choose ”Properties”.
- Edit name;
- Select different image;
- Select desired payment method from listed: PayPal, Alipay or Skrill and fill the information to make the payment method available (email or id and security code).
If you don’t want to have an online payment method attached to your site, you can leave those checkboxes unchecked. That way you’ll just have an inquiry button on cart page. Click here to see how to set the inquiry form.
- Click Apply button.
- Save Draft.
Shopping cart button in the container of ”Shop” page #
You can add the shopping cart functionality in the container of ”Shop” page – this way it will be visible only on this page.
How to do it?
- Make sure you are on the right page and you can see the Store box.
- Go with your mouse on top of ”Commerce” icon to see the sub-menu and Drag&Drop ”Store cart” to the site’s container.
- Use mouse or keyboard to position and resize it.
- Right click on the shopping cart and choose ”Properties”.
- Edit name;
- Select different image;
- Select desired payment method from listed: PayPal, Alipay or Skrill and fill the information to make the payment method available (email or id and security code).
If you don’t want to have an online payment method attached to your site, you can leave those checkboxes unchecked. That way you’ll just have an inquiry button on cart page.Click here to see how to set the inquiry form.
- Open second tab ”Options” and make sure that ”Show in current page only” is selected under Show object.
- Click Apply button.
- Save Draft.
Products #
Here is how to add/edit your products:
- Make sure you are on the right page and you can see the Store box.
- Right click on it and select ”Properties”.
- First, click on the second tab ”Settings” and set the correct currency, price prefix/postfix, thumbnail and product image sizes. If you don’t have available payment options (check the ”Shopping cart” functionalities above) click on the pencil right next to the ”Contact form” field to set the inquiry fields you want to have. You can find more information about inquiry settings here.
- When you’re ready with ”Settings” click on the third tab ”Style” and set the desired styles for products’ attributes.
- Now you’re ready to go back to first tab – ”Edit”. All products in your store are editable in this tab.
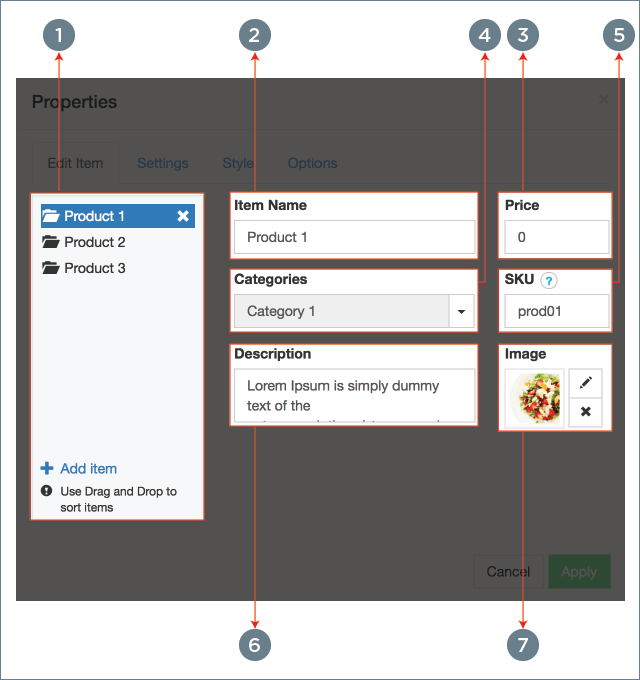
- Left panel with product list (1) – you can Drag&Drop them to change the order of appearance.
- Item name (2)
- Price (3)
- Category (4) – You can select a category for this product, or to ”Edit” categories in order to add a new one.
- SKU (5) – Stock Keeping Unit is an unique identifier (Optional field)
- Description (6) – Put product description in this field. It supports HTML tags (e.g. <b>, <em>, <a href=””>, <ul><li> and so on…)
- Image (7) – Product image
- Click Apply button when you’re ready.
- Save Draft.
Inquiry form #
If you don’t want to support online payment on your site you can have an inquiry form for your customers. That way you’ll receive an email with inquiries instead of orders in the system. Inquiries are not recorded on the Site Builder. Here is how to set it:
- Right click on Store box and select ”Properties”.
- Open the second tab ”Settings”.
- Click on the pencil right next to ”Contact form”.
- First tab ”Fields” – Activate the desired inquiry fields that customers have to enter. You can also add an additional question with predefined answers (e.g. How did you find us? – Found on google; Followed a link from another site; Friend told me). Just put one answer per row and you’ll have a select form in your inquiry.
- Second tab ”Email settings”
- Form will be sent to this E-mail – Put the email that will receive the inquiries. You can specify several emails separated by semicolons.
- Form will be sent from this Email – Put same email or any other email that will be shown as a sender. This field allows only one email.
- With Subject – Subject of the message.
- Form sent Message – The message that customer will see when he sends the inquiry. (e.g. Thank you for contacting us. Your inquiry has been sent and we’ll contact you back as soon as possible.)
- SMTP Enable – It is an optional advanced setting for sending inquiry emails. If you’re not sure how to use it leave it unchecked – the form will work anyway. If you enable SMTP option you have to add your outgoing mail settings in the fields.
- Third tab ”Settings” – You can add Google reCAPTCH to prevent spam attacks. Go to https://www.google.com/recaptcha/ and register a new site to get the keys.
- Click Apply button to save inquiry changes.
- Click Apply button to close Store box properties.
- Save Draft.
Orders #
It’s easy to track all your orders in Site Builder. Here is how to open the list:
- Make sure you are on the right page and you can see the ”Shopping cart” box.
- Right click on it and select ”Properties”.
- Click on the button ”Check orders” on ”General” tab.
- You should see a list of your orders and details for each of them.


